Fiber optic cable installation involves surveying the site, mapping the cable path, preparing the cable pathway, gathering the required installation tools, running the fiber optic cable, connecting the fiber cable ends, setting up the network connection, and testing, labeling, and documenting the completed installation. Following these steps helps reduce cable damage, prevent signal loss, improve installation quality, and create a reliable network that supports long-term business performance. Careful planning, proper cable handling, and thorough testing also simplify future maintenance, troubleshooting, and network expansion.
While these steps are standard for professional optic cable installations, simple indoor projects can often be completed without professional assistance. You can install fiber optic cable yourself using pre-terminated fiber, planning a straightforward cable path, and maintaining gentle cable bends. Pull the cable by its outer jacket, keep connectors clean, and avoid splicing or trenching to protect the cable and maintain reliable performance. However, businesses deploying permanent fiber optic infrastructure, mission-critical networks, or complex fiber systems should rely on qualified installers to ensure standards-compliant installation, dependable connectivity, and a scalable network that supports future growth.
8 Steps for Fiber Optic Cable Installation are:
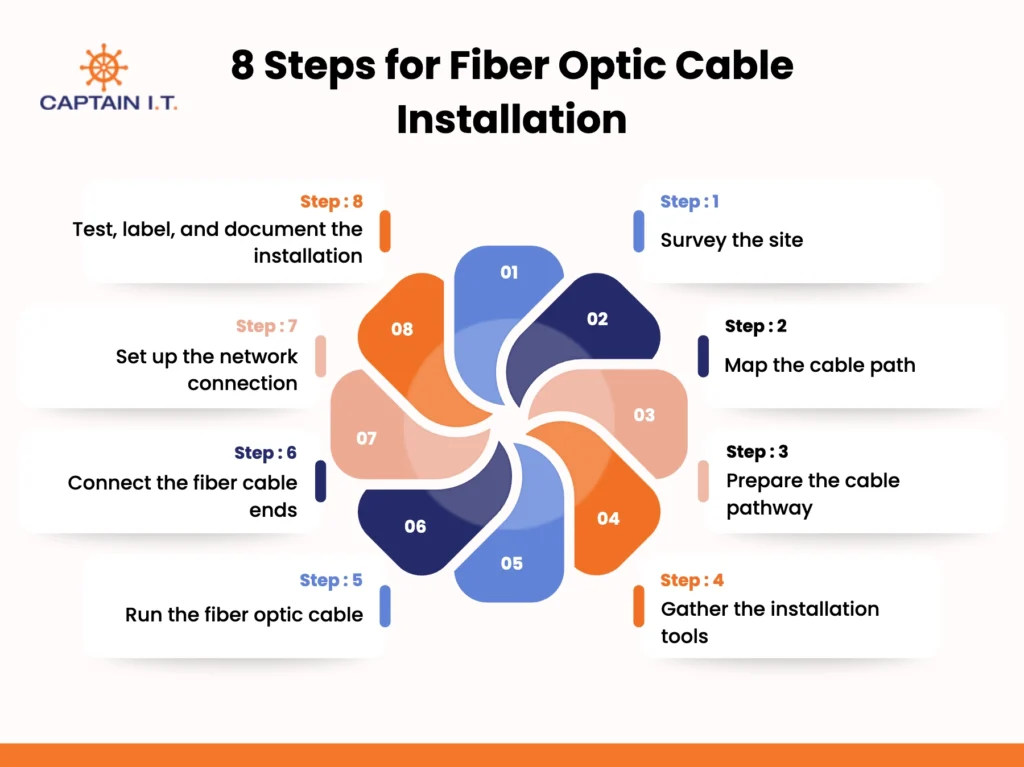
Step 1: Survey the site
Step 2: Map the cable path
Step 3: Prepare the cable pathway
Step 4: Gather the installation tools
Step 5: Run the fiber optic cable
Step 6: Connect the fiber cable ends
Step 7: Set up the network connection
Step 8: Test, label, and document the installation
- Step 1: Survey the site
Begin by surveying the entire installation area before running any fiber optic cable. Identify the cable entry point, network room, equipment rack, and connection endpoints, then determine whether the installation will follow an Inside Plant (ISP) or Outside Plant (OSP) route. This assessment helps determine whether plenum-rated (OFNP), riser-rated (OFNR), or armoured fibre-optic cable is required to comply with fire codes and environmental conditions. Inspect the proposed pathway for structural obstacles, existing utilities, limited-access areas, and environmental factors that could affect installation.Next, identify suitable locations for pull boxes, splice enclosures, and the Optical Network Terminal (ONT). Assess potential safety hazards, such as nearby electrical infrastructure, uneven terrain, or vehicle traffic, and confirm any required permits before work begins. A thorough site survey minimizes installation risks and creates a reliable foundation for the entire project.
- Step 2: Map the cable path
Plan the exact route the fiber optic cable will follow before installation begins. Whenever possible, use existing conduits, cable trays, or ladder racks, and select the shortest route between connection points. Avoid unnecessary bends, obstacles, and areas where the cable could be damaged. Follow the manufacturer’s bend radius by maintaining 20 times the cable’s outer diameter while pulling and 10 times the outer diameter after installation to protect the optical fibers from stress and signal loss.As you map the pathway, account for walls, ceilings, structural supports, and other features that affect cable routing. Install pull boxes or junction points on long cable runs and after every two 90-degree bends to reduce pulling tension and prevent cable damage. A planned route preserves signal integrity, simplifies installation, protects the fiber, and supports long-term network reliability.
- Step 3: Prepare the cable pathway
Prepare the fiber-optic cable pathway before pulling the cable to ensure safe installation and to protect it from damage. Remove dust, debris, and sharp edges from conduits, cable trays, and ladder racks, then verify there is enough space for the cable to pass through without excessive friction. If routing through existing conduits, ensure the conduit fill does not exceed 40% of the conduit’s internal capacity to prevent overcrowding, excessive pulling resistance, and cable damage. Install J-hooks, cable trays, innerduct, or similar supports to maintain proper cable alignment.Feed a pull string or fish tape through the complete route before installation, then use a mandrel, brush, or vacuum to remove dirt and construction debris. Support vertical runs to prevent excessive strain on the fibers, and choose the appropriate indoor or outdoor cable accordingly.
- Step 4: Gather the installation tools
Gather all necessary installation tools, such as cable preparation, pulling, cleaning, termination, and testing equipment, before starting the project to prevent interruptions and improve efficiency. Essential tools include cable cutters, fiber-optic strippers, pull tape or fish tape, fiber-safe pulling lubricant, high-tensile mule tape, Kevlar shears, a precision fiber cleaver, and cleaning supplies for connectors. Prepare protective equipment and ensure every tool is clean, functional, and compatible with the selected cable type.Depending on the installation environment, additional equipment such as innerduct, microducts, cable supports, a Visual Fault Locator (VFL), an Optical Power Meter (OPM), and an Optical Time-Domain Reflectometer (OTDR) may also be required. Clean connectors with lint-free wipes and 99.9% isopropyl alcohol before inspecting them with a fiber inspection microscope. Proper preparation protects the fiber, verifies installation quality, identifies faults early, reduces downtime, and keeps the project progressing efficiently.
- Step 5: Run the fiber optic cable
Carefully run the fiber optic cable through the prepared pathway while following the manufacturer’s recommended pulling tension and minimum bend radius. Guide the cable smoothly through conduits, trays, or supports without dragging it across rough surfaces or forcing it around tight corners. Use a breakaway swivel to prevent pulling tension from exceeding the cable’s rated limit, protecting the delicate optical fibers from stretching or breaking. If the cable must be unspooled midway, use the Figure-8 looping method to prevent twisting and kinking.Remember that installation limits vary by cable type. Indoor and outdoor cables, along with single-mode and multi-mode fiber, have different bend radii, pulling tensions, distances, and handling requirements. Leave 15 to 30 feet of service loop at termination points and major pull boxes to support future maintenance while preserving long-term network reliability.
- Step 6: Connect the fiber cable ends
Prepare each fiber cable end carefully before making any network connection. Remove the outer jacket and buffer coating using a fiber-optic stripper, then clean every exposed fiber with lint-free wipes and an approved cleaning solution to remove dust, oil, and debris. Clean fiber ends reduce signal loss and improve the quality of every optical connection.Once prepared, terminate the fiber using the appropriate connector or perform a fusion splice where required, following industry-standard procedures. Inspect every connector or splice with a fiber inspection microscope before completing the connection to identify contamination, scratches, or alignment issues. Proper termination and inspection improve network reliability and help prevent performance problems after installation.
- Step 7: Set up the network connection
Connect the installed fiber-optic cable to the required network hardware to complete the business network. Begin by connecting the cable to the Optical Network Terminal (ONT), then connect the ONT to the router or firewall to manage internet access and network security. Finally, connect the router to the network switch so multiple devices can access the network reliably.Organize all fiber connections through a patch panel to simplify cable management and future maintenance, then mount the equipment securely within a network rack. Properly integrating these components improves network organization, supports efficient data transmission, simplifies future upgrades, and provides reliable connectivity for servers, workstations, wireless access points, and other business devices.
- Step 8: Test, label, and document the installation
Verify the completed installation before placing the network into service. Inspect every connector for contamination or damage, then perform Tier 1 testing with an Optical Power Meter (OPM) to measure insertion loss and confirm the link meets the calculated optical loss budget. Follow this with Tier 2 testing using an Optical Time-Domain Reflectometer (OTDR) to locate signal loss, splices, connectors, bends, or other faults that could affect network performance.After testing, label every cable, connector, patch panel port, and enclosure using a durable identification system that complies with ANSI/TIA-606 standards. Document cable routes, termination points, OTDR trace files, loss measurements, equipment connections, and network topology to create accurate installation records. Complete documentation establishes a performance baseline, simplifies troubleshooting, supports future upgrades, and improves long-term infrastructure management.
Can You Install Fiber Optic Cable Yourself?
Yes, you can install fiber-optic cable yourself for simple residential or small-business projects by using pre-terminated fiber cables, planning a straightforward cable route, maintaining gentle bends, pulling the cable from the outer jacket, keeping connectors clean, and avoiding splicing or trenching. These practices reduce cable damage and signal loss, but underground installation, fiber splicing, and complex network configurations should be handled by qualified fiber-optic installation technicians to ensure reliable SMB connectivity.
You can install fiber-optic cable by yourself by following the steps below:
- Step 1: Use pre-terminated fiber
Choose pre-terminated fiber-optic cables for DIY installation because they come with factory-installed connectors that plug directly into compatible network equipment. This eliminates the need for specialized splicing or termination tools while reducing the risk of installation errors. Measure the required cable length carefully before purchasing to avoid unnecessary joints, cable strain, or signal loss during installation.
- Step 2: Map a simple path
Plan the cable route before installation by selecting the shortest, most direct path between connection points. Use existing conduits or cable trays where available, and avoid unnecessary bends, obstacles, or high-traffic areas that could damage the cable. A simple pathway makes installation easier, protects the fiber from physical stress, and simplifies future maintenance or upgrades.
- Step 3: Keep bends gentle
Maintain gentle bends throughout the installation to protect the delicate optical fibers inside the cable. Always follow the manufacturer’s recommended minimum bend radius and avoid forcing the cable around tight corners or sharp edges. Use gradual curves and support the cable where needed to prevent unnecessary strain, preserving signal quality and ensuring reliable long-term network performance.
- Step 4: Pull from the jacket
Attach the pull string or fish tape to the cable’s outer jacket rather than the internal fiber strands when routing the cable. Pull the cable steadily without excessive force, twisting, or sudden movements that could damage the fibers. Following proper pulling techniques protects the cable structure, reduces the risk of breakage, and helps maintain reliable signal transmission.
- Step 5: Keep connectors clean
Inspect and clean every fiber connector before making a connection to prevent contamination from dust, fingerprints, or debris. Use lint-free wipes and approved fiber-cleaning solutions, and avoid direct contact with the connector end face. Clean connectors reduce insertion loss, improve signal quality, and help prevent connection failures that could affect overall network performance.
- Step 6: Avoid splicing and trenching
Avoid splicing bare fiber or trenching cable routes during DIY installations because both require specialized equipment, technical expertise, and additional safety precautions. Instead, use continuous pre-terminated fiber wherever possible to eliminate unnecessary connection points. If your project requires underground routing, permanent cabling, or field splicing, stop and hire a qualified fiber optic installer.
When Should a Business Hire Professionals for Fiber Optic Cable Installation?
A business should hire professionals for fiber optic cable installation when the project extends beyond a simple indoor cable run and involves permanent infrastructure, specialized equipment, or advanced technical work. Professional installation is also recommended when SMBs deploy mission-critical networks, expand to new office locations, support cloud applications, or handle sensitive business data where downtime can disrupt daily operations. Certified network cabling services complete these projects safely, comply with industry standards, and deliver reliable, long-term network performance.
Businesses should hire professionals for projects involving:
- Mission-critical business networks
- Long-distance fiber deployments
- Sensitive data environments
- Multi-building or campus-wide networks
- Server room or data center installations
- Fusion splicing and fiber termination
- Underground routing and complex cable pathways
- Testing, certification, and regulatory compliance
How Much Does Fiber Optic Cable Installation Cost?
Fiber optic cable installation costs range from $1,500 to $7,000 for residential projects, $1,000 to $10,000 for small businesses with nearby fiber infrastructure, and $5,000 to $50,000+ for commercial installations. Per-foot costs for fiber-optic cable installation range from $1 to $50, depending on cable length, route complexity, and the scope of work. Total installation costs also vary based on labor, installation method, cable type, splicing, testing, and certification requirements.
Indoor installations using existing conduits cost less than underground or aerial installations requiring trenching, new conduit, or specialized equipment. Other cost factors include single-mode or multi-mode fiber, route accessibility, patch panel or network rack installation, fusion splicing, and post-installation testing. Evaluating these factors helps SMBs accurately estimate project costs, avoid unexpected installation expenses, and build a reliable, scalable fiber-optic network that supports future business growth.
What Are Common Fiber Optic Installation Mistakes to Avoid?
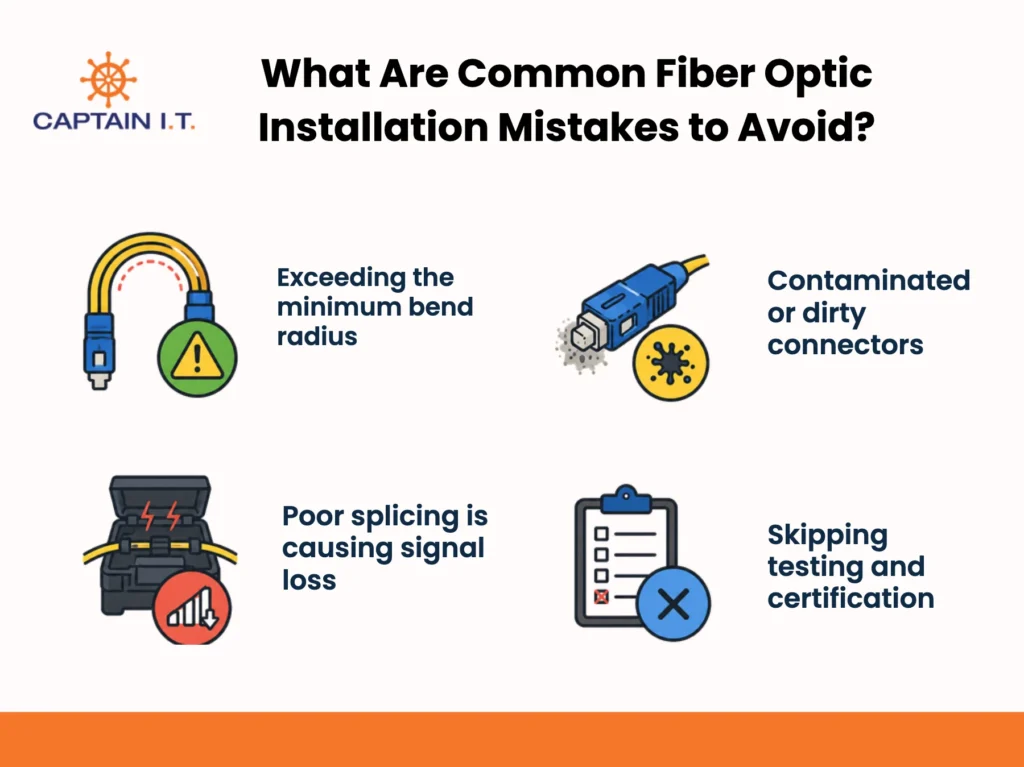
Common fiber-optic installation mistakes to avoid include exceeding the minimum bend radius, poor splicing that causes signal loss, contaminated or dirty connectors, and skipping testing and certification. These mistakes can damage fiber cables, weaken signal quality, increase downtime, and disrupt the cloud applications, VoIP systems, and day-to-day operations that many SMBs rely on. Following proper installation practices, using the correct tools, and verifying every connection helps maintain reliable network performance and reduces costly repairs.
4 common fiber-optic installation mistakes to avoid are:
- Exceeding the minimum bend radius
Bending a fiber optic cable beyond its recommended minimum radius places excessive stress on the optical fibers, causing signal loss and permanent cable damage. Sharp bends create micro-bends or cracks that weaken light transmission and reduce network performance. Always maintain gradual curves and follow the manufacturer’s bend radius specifications to protect the cable and ensure reliable long-term network operation.
- Poor splicing is causing signal loss
Improperly aligned fiber ends or contaminated splice points increase attenuation and weaken signal transmission throughout the network. Incorrect cleaving or poor fusion splicing can also cause back reflections and unstable connections, reducing overall performance. Perform splicing in a clean environment with proper equipment, then inspect each splice carefully to ensure a durable, low-loss optical connection.
- Contaminated or dirty connectors
Dust, fingerprints, oil, and other contaminants on connector end-faces interfere with light transmission and can permanently damage optical surfaces. Even small particles increase insertion loss and reduce overall network reliability. Clean every connector with approved fiber-cleaning tools and inspect each connector before mating to maintain consistent signal quality and dependable long-term network performance.
- Skipping testing and certification
Hidden installation faults often remain undetected until they cause outages or poor network performance. Verifying every fiber run with tools such as an Optical Time Domain Reflectometer (OTDR) or insertion loss tester confirms acceptable signal quality before deployment. Recording test results also simplifies future troubleshooting, maintenance, compliance, and network expansion while ensuring installation quality.
What Are Tips for a Reliable Fiber Optic Cable Installation?
The best tips for a reliable fiber optic cable installation include using fiber optic lubricant during pulls, planning the route to minimize splices and connectors, using high-quality cables and connectors, and training installers on proper handling. Following these practices helps prevent cable damage, reduce signal loss, improve installation quality, and ensure SMBs have a reliable network that supports business-critical applications.
Below are some tips for a reliable fiber-optic cable installation:
- Use fiber optic lubricant during pulls
Apply fiber-compatible pulling lubricant when routing cable through long conduits or complex pathways to reduce friction and pulling resistance. Lubricant protects the cable jacket from abrasion and minimizes stress on the optical fibers during installation. Apply it evenly along the cable as recommended by the manufacturer, and use only products specifically designed for fiber-optic cables.
- Plan the route to minimize splices and connectors
Design the cable route to minimize splices and connector points, since each additional connection increases the risk of signal loss and future maintenance issues. Whenever practical, use longer continuous cable runs and direct pathways to reduce interruption points. Careful route planning improves network reliability, simplifies troubleshooting, and lowers long-term maintenance requirements.
- Use high-quality cable and connectors
Choose high-quality fiber optic cables and connectors that meet recognized industry standards to ensure reliable signal transmission and long-term durability. Well-manufactured cables provide stronger protection for the optical fibers, while precision connectors reduce insertion loss and maintain stable connections. Investing in quality components minimizes network failures, improves performance, and extends the lifespan of the installation.
- Train installers on proper handling
Provide fiber-optic cable installers with training on proper fiber-handling techniques, including maintaining the minimum bend radius, following proper pulling methods, cleaning connectors, and protecting cables during installation. Well-trained fiber optic cable installers are less likely to damage optical fibers or introduce installation defects. Proper training improves installation quality, reduces costly mistakes, and supports consistent long-term network performance.
What Are the Benefits of Fiber Optic Cable Installation?
The primary benefits of fiber-optic cable installation include faster data transmission, higher bandwidth, lower signal loss over distance, greater resistance to interference, and more reliable business network performance. Together, these advantages help SMBs operate cloud applications, VoIP systems, security cameras, file sharing, and other business-critical workloads without sacrificing speed or reliability. A well-installed fiber network also provides the scalability needed to accommodate future business growth.
The benefits of fiber optic cable installation are:
- Faster data transmission
Fiber-optic cable transmits data using light pulses instead of electrical signals, delivering speeds of up to 10 Gbps and performance over 100 times faster than copper. Faster transmission enables SMBs to support real-time cloud applications, VoIP communications, video conferencing, and large-file transfers while reducing delays and improving productivity across the entire network.
- Higher bandwidth
Greater bandwidth allows significantly more data to move across the network simultaneously without congestion. This supports multiple users, connected devices, cloud platforms, video conferencing, and other bandwidth-intensive workloads. Growing SMBs benefit from the ability to accommodate increasing network demands without sacrificing performance, making future expansion simpler and more efficient.
- Lower signal loss over distance
Remarkably low attenuation allows data to travel across multiple kilometers without frequent signal boosters or noticeable performance degradation. Maintaining stronger signal quality over long distances supports reliable communication between offices, server rooms, and distributed facilities. Small and mid-sized businesses benefit from stable connectivity, consistent data transmission, and dependable network performance across large or expanding environments.
- Better resistance to interference
Immunity to electromagnetic and electrical interference keeps network connections stable even in the presence of power lines, manufacturing equipment, and other electrical systems. Unlike copper cabling, optical fiber is unaffected by these disruptions, preserving signal integrity and reducing communication failures. This makes fiber-optic cabling well-suited for SMBs that depend on consistent network performance and reliable data transmission.
- More reliable business network performance
Combining high speed, low signal loss, and strong resistance to interference creates a more reliable business network with lower latency and reduced downtime. SMBs can maintain uninterrupted access to cloud services, VoIP systems, security cameras, servers, and other critical applications. Reliable fiber infrastructure also supports future growth while minimizing maintenance requirements and network interruptions.